Bundle Management
11 min
Feature Overview
Bundle Management is a self-service feature in SHI One that lets you create, manage, and publish product bundles directly from the storefront admin experience.
This feature is built for admins who manage storefront experiences.
What it enables:
- Build curated purchasing experiences tailored to your end-users
- Go from idea to published bundle in minutes, not days
- Control exactly what products appear and how they are grouped
Key Terms
- Bundle: A grouped set of products presented as a single, guided purchasing experience. It includes a base product and optional add-ons.
- Base Product: The primary product that anchors the bundle. It determines the base price and how the bundle appears in search.
- Add-On Section: A configurable group of products (like accessories or warranties) that shoppers can choose from when purchasing the bundle.
- Option Type: Determines whether a section allows the shopper to pick one item (Single Select) or multiple items (Multi Select).
- Status: The lifecycle state of a bundle. Options are Active, Inactive, or Archived.
- Composite Item: A product type with pricing that is eligible to be included in a bundle. Products that are not composite items cannot be added.
- Standards Location: The catalog folder(s) where the bundle will appear in the storefront.
How these relate to each other: Bundle > Base Product > Add-On Sections > Options
What You Can Do
- Create bundles using drag-and-drop product configuration with a real-time preview of the shopper experience.
- Customize the buying experience by defining required sections, setting defaults, and configuring quantity controls.
- Control product visibility by surfacing products through bundles instead of showing them individually in the catalog.
- Manage the full lifecycle of a bundle: activate, deactivate, archive, edit, or delete at any time.
- Place bundles in specific Standards folders to curate exactly where they show up in the storefront.
A few things to keep in mind:
- Products must be composite items with pricing to be eligible for bundles.
- If this does not exist for your desired product, please reach out to your account executive.
- Once you set a section's option type (Single Select or Multi Select), it cannot be changed after creation.
- The bundle name is currently auto-derived from the base product name. Custom naming is planned for a future update.
Getting Started
Accessing the Feature
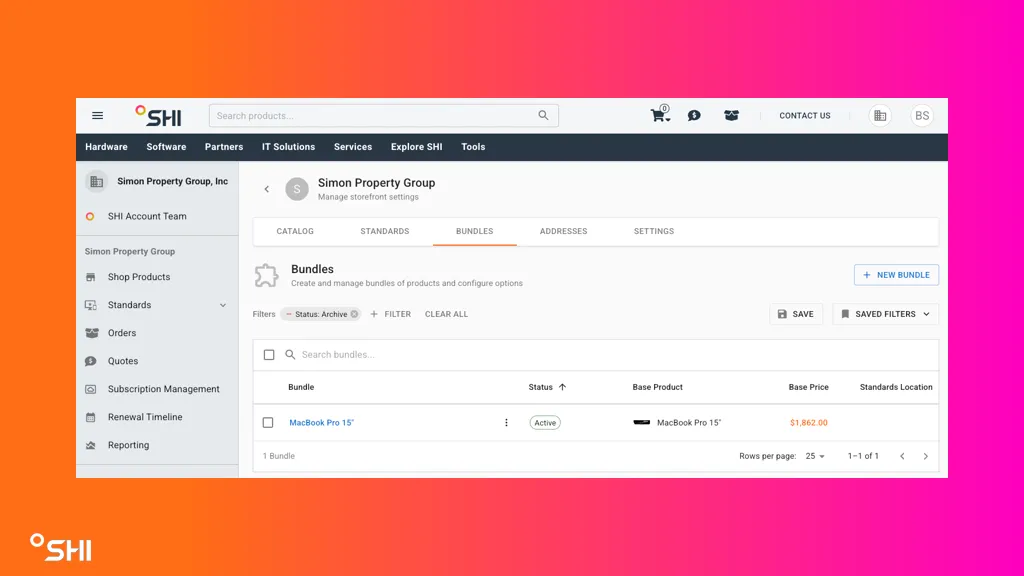
- Navigate to Standards> Manage Standards> Bundles.
- Make sure you have the appropriate role or permissions. You will need Customer Success or Storefront Admin access.
Prerequisites
- Role: SHI One Admin or Storefront Manager
- Products: Items you want to bundle must be configured as composite items with pricing
Using Bundle Management
1. Creating a New Bundle
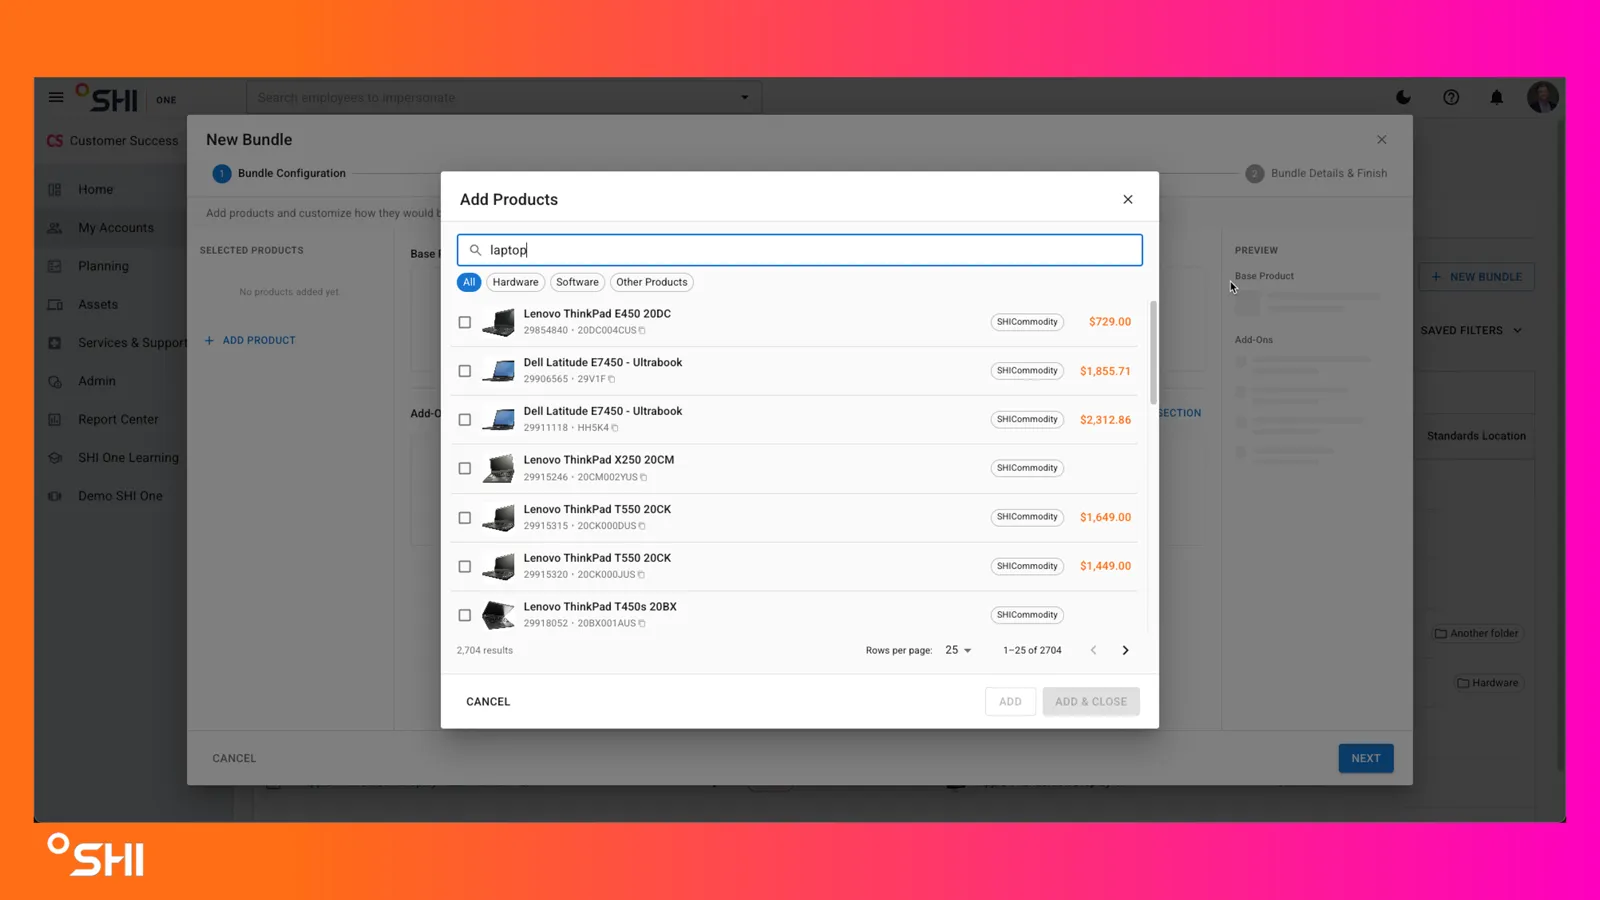
- Select + New Bundle from the Bundles tab.
- Select Add Product and search for items by name or part number. You can filter results by Hardware, Software, or Other Products.
- Drag and drop products into position:
- Base Product: Choose one item as the primary product.
- Add-On Sections: Group the remaining items into sections that represent choices for the shopper.
- Configure each section:
- Give it a descriptive Section Name (for example, "Choose your monitor").
- Set the Option Type to Single Select or Multi Select.
- Toggle Required if the shopper must make a selection.
- Open Option Settings to set default quantity, min/max values, or mark an option as selected by default.
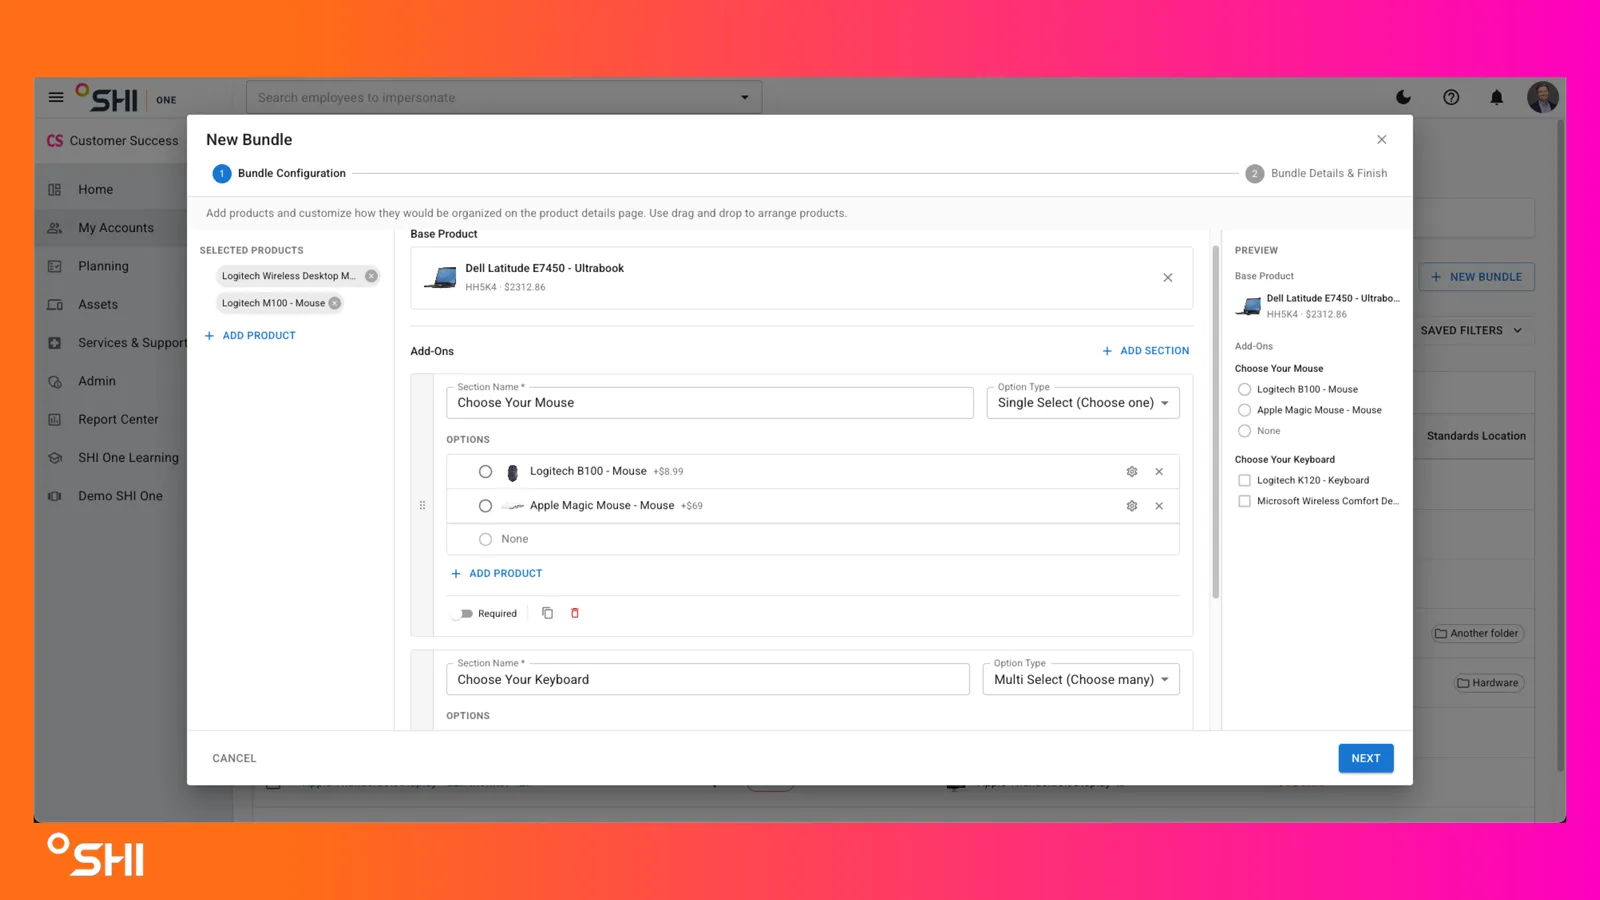
- Select Next to move to Bundle Details & Finish.
- Complete the bundle details:
- Status: Choose Active, or Inactive. Starting with Inactive is recommended so you can review before publishing.
- Standards Location: Select which standards folders the bundle should appear in.
- Select Create to finalize.
- Your new bundle now appears in the Bundles list and is ready to manage.
2. Editing an Existing Bundle
- From the Bundles list, select a bundle name to open it, or use the overflow menu (three dots) to choose Edit.
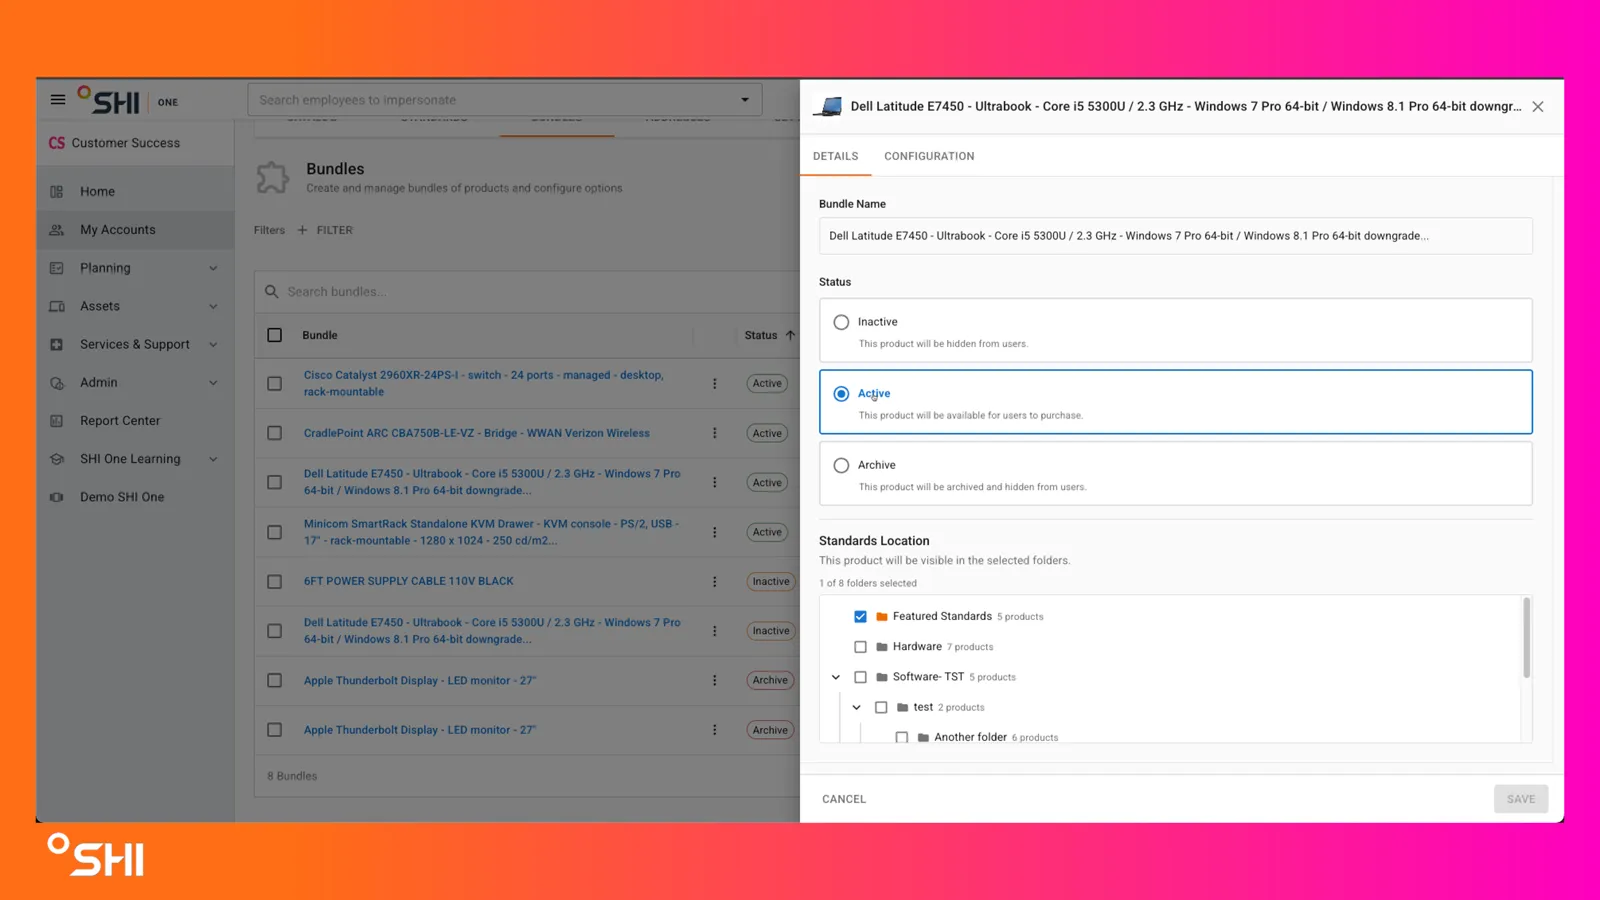
- Make your changes:
- Update sections, swap products, or rearrange options.
- Switch to the Details tab to change the status or update the Standards location.
- Select Save when finished.
- Your changes are saved and reflected in the storefront based on the bundle's current status.
3. Managing Products and Options
- Open a bundle and navigate to the Configuration tab.
- To add more products, select Add Product. This opens the same search experience used during creation.
- To fine-tune individual options, open Option Settings (the gear icon) on any item:
- Adjust default quantity
- Set minimum and maximum quantity ranges
- Toggle whether the option is selected by default
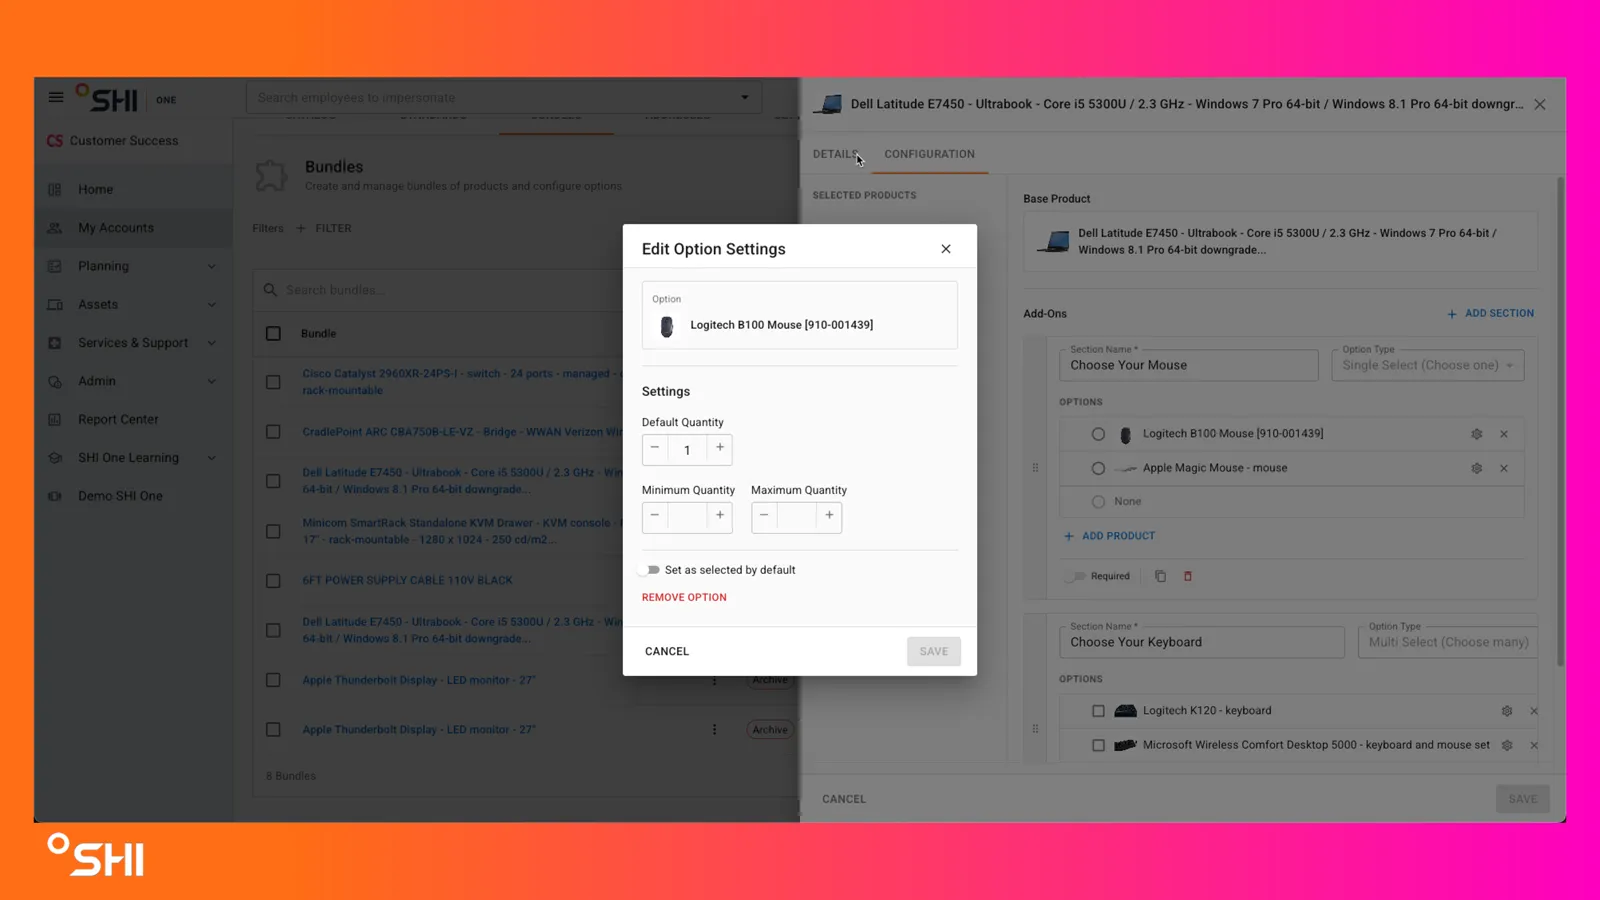
- Remove products by selecting the X next to them, or reorder items by dragging them into a new position.
- Changes take effect after you select Save.
4. Viewing and Filtering Bundles
The Bundles tab gives you a quick overview of everything that has been created for the account.
- Use the search bar and filters to find specific bundles.
- The table displays Bundle Name, Status, Base Product, Base Price, and Standards Location at a glance.
5. Bundle Lifecycle Management
You can manage the status of any bundle directly from the list view.
- Open the overflow menu (three dots) on any bundle.
- Choose an action:
- Edit: Open up editing drawer detailed above.
- Activate: Makes the bundle visible to shoppers in the storefront.
- Deactivate: Moves the bundle back to a draft state.
- Archive: Removes the bundle from active display without deleting it.
- Delete: Permanently removes the bundle.
- Confirm the action. The bundle's status updates immediately.
Use Cases
- New hire onboarding kit: Set a laptop as the base product, add required accessories like a keyboard and mouse, and include optional upgrades like an external monitor or docking station.
- Standardized purchasing: Enforce approved product configurations to reduce incorrect or off-catalog ordering.
- Catalog simplification: Hide standalone products and surface them only within curated bundles, giving shoppers a cleaner, more guided experience.
Best Practices
- Start new bundles in Inactive status so you can review and refine before making them visible.
- Use the Required toggle on sections where shoppers need to make a selection (like choosing a warranty tier).
- Group related products logically so sections are easy for shoppers to understand at a glance.
- Take advantage of the cross-catalog product search to build more comprehensive bundles beyond what is already in the customer's catalog.
Troubleshooting and FAQs
Common Issues
- "Product Not Eligible" warning: The product is not a composite item or does not have pricing. Remove it by selecting Unselect, and if you need the product added as a composite item, reach out to WebAdmin.
- Cannot change option type: Option type (Single Select or Multi Select) is locked after the section is created. If you need a different type, create a new section and delete the old one.
- Product not appearing in search: Try broadening your search terms. If the product still does not appear, it may need to be added through WebAdmin.
FAQs
- Can I edit bundles that are already active? Yes. Open the bundle, make changes, and save. Updates apply based on the bundle's current status.